Showing posts with label info-turials. Show all posts

Saturday, October 18, 2008

Some Stuff

My birthday's coming up! On November 11th I will be twenty-five years old. I'm an old, old woman. If my dear readers feel so inclined, feel free to send me a book from my amazon.com wish list. Used books are fine--I'm not too picky about getting new books.

My Amazon.com Wish List

Also, I've been getting requests about sharing my knowledge of making latex clothing. Yes, I do intend to share, but as the saying goes "you scratch my back and I'll scratch yours." What I'm saying is that I need something in return, not cash or shoes or clothing but something, that something being books. As a student and artist my funds are stretched rather thin. Receiving books I need--and want--would take some pressure off.

This is how it will go: I will write a tutorial blog post. If I receive a book or two, then I will write another one. If I receive nothing, then I will remove the post. The tutorials will alternate between basic crafting levels, intermediate and pro, and will include all aspects of the craft. My first tutorial will be a compendium of reference books and websites.

By the way, I do have latex sheeting available. Contact bettylabamba[at]hotmail for more info. Please note that if your email is just about general correspondence, it may take awhile for me to send a decent response. I failed basic correspondence in high school. Alas, I'm one of those people.

Thursday, November 08, 2007

New Latex Rubber Sheeting Colors

If you haven't heard about it already, you've heard it here first.

Here's some exciting news in the fast-paced, dog-eat-dog world of latex rubber sheeting. 4D Rubber has just come out with two new latex colors, Supatex Vibrant White and Semi-Trans Cloud Grey.


So why did 4D make another white and another grey?


White latex is not a true white; it's an off-white cream color that yellows very easily. Although the difference between the two whites is not so pronounced in this horrible photo I took, the Vibrant White is noticeably brighter than the standard white. In person, it really pops. The regular creamy white is nice, but it tends to look dingy after a while, especially if it's not contrasted with a dark color. Maybe with this new Vibrant White, white latex won't be such a frustrating "labor of love".

Supatex White contrasted with Supatex Vibrant White:


Onto the greys. You're already familiar with the Semi-Trans Grey, which is commonly referred to as "Semi-Trans Smoke" or just plain "Smoke" since it has no resemblance to any kind of grey. The new color, Semi-Trans Cloud Grey, is an actual cool grey. Look at the picture below to see the difference. I placed a Betty LaBamba label underneath the Cloud Grey to indicate the level of transparency.

Semi-Trans Grey contrasted with Semi-Trans Cloud Grey:


Forget 4D for a minute. Here's a particularly delicious sheeting color by the new sheeting manufacturer, Radical Rubber. The official name is Metallic Fuschia, but I call it Metallic Pink. Don't ask me why I change names--it's my only pleasure in life. I expect it will be a hit with all lovers of pink, Barbie, and the Rubber Doll enthusiasts.


Radical Rubber's Metallic Fuschia:


Halter by Betty LaBamba.

Tuesday, September 18, 2007

Drying & Talcing Latex Garments

Taking proper care of your latex garments is one of those things many rubber enthusiasts talk about but, I suspect, very few actually practice in real life. I always come across the excuse that it takes too much time, and yada yada [insert your own B.S. excuse here]. So, you're basically telling me you spent $200+ on one garment alone, and after spending five hours at a party working up a sweat on the dance floor, you're gonna go home, peel it off, then crumple it up in a ball and toss it in your closet? Go right ahead. Waste your money. Don't come crying to me because all your latex smells like ass and looks like a truck ran over it.

I prepared a little photo demo showing you an easy, painless way to dry and talc your latex that takes only about five to ten minutes per garment including washing once you get the hang of it. Keep in mind that if you have to wash something with a lot of surface area, like a gown, it's going to take longer. It's a good, fast system that you can tailor to your own specific needs. [The only reason I didn't include a washing demo with photos is because I didn't have anyone to hold the camera while I was rinsing the garment, and I really didn't want to risk dropping the camera in the sink. Go here instead.]

Here's the star of our drying and talcing demo. She's an olive green halter top with hot pink trim by Betty LaBamba (of course!).


In the next photo, we see an wet garment turned inside out. [I'll do a washing demo sometime in the future if requested.] Basically, I just rinsed it in warm water without soap and used a soft sponge on the outside to remove the excess silicon polish. I'll break down this ridiculously easy process into steps for you.

Step #1: Turn the garment inside out, and place it on a clean, soft, dry towel. I usually start with the front of the garment. This will help save drying time since it will soak up much of the moisture on the back while you're drying the front. Have a few extra towels handy if you have a big job to do. Ever try to dry yourself off with a wet towel? [Look at the craftsmanship on the halter. Don't I do good work?]


Step #2: Get another soft, clean, dry towel, and start drying the garment. Concentrate on drying the seams first. However, if your garment has any grommet closures (aka lace-up or corset style) or zips, dry that area first, then go onto the seams. You don't have to scrub or press hard. Straight, gentle motions are fine. Don't worry too much about getting it exactly bone dry on the first go.

Step #3: Turn the inside out garment right side out. If it has been repeatedly shined, you will notice that the shiny outside of the garment dries faster than the rougher inside. Once again, concentrate on the seams then dry the rest. This time, be a little gentler with the towel so you don't accidentally scratch the surface.

Step #4: Next, make sure you got the garment as dry as possible (both inside and out) with the towel. You will know it's dry because it will feel dry to the touch and the latex material will have turned a lighter color. See this post again.

Step #5: Now it's time to talc it up like no tomorrow. Maybe I shouldn't have phrased it that way. You don't have to use a massive amount of talc--just enough to get the job done. I use a make-up brush to apply the talc. Note: don't use your wife's make-up brush. Use a new one without any make-up particles on it. You can buy one for cheap in any drug store.

With the make-up brush, you can get an even application. Once again, I like to start inside out, then turn it right side out. You don't have to talc the outside of the garment if you believe it's unnecessary, but I usually put on a light coating.

Here you can see the final results of our drying and talcing demo. It's all nice, clean, and ready for storage or another night out on the town.


Legal Disclaimer: Neither I nor Betty LaBamba are responsible if you somehow fuck up your garment in any way. It's all you. Don't blame me for shit. I spent hours putting this entry together for your benefit.

Friday, August 03, 2007

Semi-Transparent Smoke VS Semi-Transparent Black

4D Rubber makes the Semi-Trans Smoke, officially termed Semi-Trans Grey, which I previously wrote about here. The Semi-Trans Black is made by Radical Rubber, the new latex kid on the block.

So what's the difference between them? I took pictures. Look.

I'm guessing both companies use some kind of black pigment for both. One's a hell of a lot greener than the other, obviously. However, S.T. Black does have a slight greenish hue, though on the whole it appears very brownish under most lighting conditions. This reminds me of one time in high school art class when I was mixing black and white paint together. You would think I would get gray paint out of the mix, but no....I got some fucked up chartreuse green. It may have been because of my Alice in Wonderland luck or because of the excellent fine arts department at my ol' high school where the track coach was also the art teacher. He was a real character, as are all high school teachers, and had no artistic ability or critical eye. His only direction to us art students was "You should put some more glue on this" or "Let me put some glue on that." On second thought, maybe I actually did learn something from that class. Excuse me while I go put some glue on some latex.


S.T. Smoke and S.T. Black photographed over a white background:


S.T. Smoke and S.T. Black over my arm:

Wednesday, March 14, 2007

Three 4D Pinks Contrasted

I just realized that I haven't done any type of materials post in quite a long fucking time. Here's a short one to keep you grubby little children happy.

[I'm not one to bleg, but, if the info in these educational posts have helped you make a bit o' cash, email me {bettylabamba{at}hotmail} to find out how you can help me kick my four page Amazon wishlist's ass. If you want to be an ingrate, go fork yourself.]

4D Rubber carries several types of pinks: baby pink, pink, semi transparent pink, vibrant pink (hot pink), and vibrant magenta. For more info on the vibrant colours, track back to this post; on standard colours, this post. So what's the effing difference between them?


Above is a photo of my surgical masks in Neon/Vibrant Magenta, Neon/Vibrant/Hot Pink, and Regular/Standard Pink. Baby Pink is not represented because I don't have any in stock; Semi-Trans Pink is basically almost the same shit as regular pink but transparent.

Notice how bright Neon Magenta looks. Most other colors, even Hot Pink, will look pale in contrast. Personally, I prefer Hot Pink over Neon Magenta: it's just more feminine in a bubblegum way. Although it's not classified as such, Neon Magenta is also transparent, more so than Semi-Trans Blue or Semi-Trans Purple. If you want a transparent hot pink latex garment, go with Neon Magenta in an 0.33mm or less gauge.

On a closing note I'd like to point out that our perception of color changes with what type of lighting the color is viewed under and if it's contrasted next to another color. For example, white latex by itself looks a bit yellowish, but when placed next to black latex, it begins to resemble a true white like a piece of photo copy paper.

Saturday, October 28, 2006

Stuff Every Latex Consumer Should Know About 4D Transparency Variations & Color Name Misnomers Vol. 3: Semi-Trans Colors

Hello & Welcome! to part 3 of this series. Part 2 is about the bright colors and can be found here.
Before we get this blog entry started, I'd like to make an early birthday shout out to Louise Brooks. Girl, Nov. 14 you will be 100 years old. You've been dead over 20 years, but you're still hot as hell, and we all love you and your iconic haircut.

4D Rubber [the only latex sheet manufacturer for fashion apparel that matters besides the much undeservedly maligned Hygenic] makes a designated "Semi-Transparent" set of colors, also know as "Semi-Trans" for short. The latex designers/companies call them Semi-Transparent, Semi-Trans, or just plain Transparent. The hyphen is optional. [Now, if you're wondering why I am capitalizing Semi-Trans--which you probably are not, but whatevs--it's because this is a very sacred subject to me. More sacred than the Supreme Being. Truly.]

The official Semi-Trans colors include: blue, green, grey, mauve [more commonly known as purple to us plebes], natural, pink, red, yellow. These are the official names made up by 4D. When it comes to what other people call them, things start getting a little fucked up, especially when it comes to that so-called "grey" color [separate post on that coming up].

Transparency
The actually transparency of the colors are not too consistent across the board. Some are more transparent than others. I guess there's a reason why they're called "Semi-Trans" and not "Totally-Trans". The lighter colors like Natural, Yellow, Pink, and also Green and Grey are the most transparent. Blue, Mauve [aka Purple], and Red are much less transparent. Tip: If you want to optimize the transparency of your Semi-Trans outfit, use lube inside and out.

Thickness
The thickness, or gauge, of Semi-Trans sheeting only comes in 0.33mm and 0.45mm. However, Natural is also classified as a Standard color and comes in every gauge 4D offers.


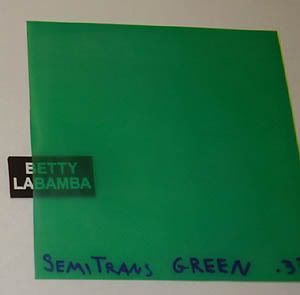
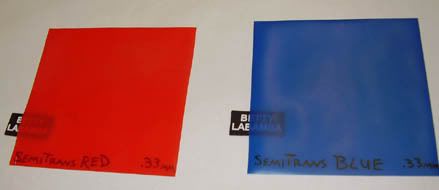
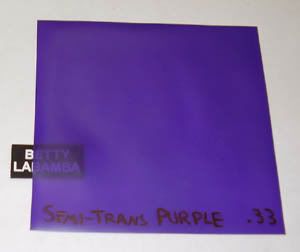
The following pics should give you a good idea of what the colors look like. The photographed swatches are of 0.33mm sheeting, unshined. I placed a BLB label halfway under each swatch to demonstrate the varying amount of transparency of each color. Note: I (and several other companies) refer to Semi-Trans Grey as "Semi-Trans Smoke". Clicky on the links to see:

Semi-Trans Natural & Semi-Trans Pink

Semi-Trans Smoke [aka "Grey"] & Semi-Trans Yellow

Semi-Trans Green

Semi-Trans Red & Semi-Trans Blue

Semi-Trans Purple

Friday, October 06, 2006

4D Latex Sheet Thicknesses

4D--the premier [aka the supreme dictator. Kidding! I kid! I heart 4D!] manufacturer of latex rubber sheeting for fashion purposes--makes sheeting in various gauges, or thicknesses. The different thicknesses allow us latex designers to make a bunch of different, you know, cool stuff. If they only made sheeting in one gauge, it would make our lives more difficult than it already is.
Latex clothing is tre expensive! I hope this post will help you become a more informed latex clothing consumer or d.i.y.-er (and fetishist!).

4D uses metric measurements. Gauges are specified in millimeters. So, when you see "mm", it means millimeters--not millipedes. FYI: 4D sells latex rolls in increments of 10 and 5 meters, not yards. Similarly, they denote fabric widths by centimeters, not inches. By the way, they only offer two fabric widths: 92cm & 200cm. For $64,000, guess which one costs more. If you see a slip up where I write "yards" or "inches" instead of "meters" or "centimeters", I apologize in advance for being a dumb bourgeois fat pig New Jersey-bred American. Honestly.

Besides depending on the type of colors, the wholesale price of latex sheeting is largely dictated by its thickness, or gauge. Not talking 'bout the actual length or width of the sheet here. The thinnest sheeting is the least expensive, while the thickest sheet is the most expensive. (And boy do they get expensive!). Ergo, expect to pay more for thicker stuff.

0.16mm The thinnest sheeting 4D manufactures for fashion sheeting. Very very thin--much like a condom or dental dam. I rarely see this gauge used in fashion apparel. The norm for ultra thin items is 0.20mm. 0.16mm is great for stuff like props, backgrounds, and anything calling for a super gossamer look.

0.20mm So stretchy and clingy, it actually feels like a second skin! It's also very comfortable to wear over long periods of time. This gauge is optimal for lingerie, stockings, and anything where a light look and feel is needed.

FYI: The thinner the sheeting, the more tricky it is to manipulate, i.e. glue successfully.

Also, this may be obvious but, the thinner the gauge the more "stretchy" the sheeting. Garment patterns should be dictated by which preferred gauge is used. For example, most patterns are now being increasingly drafted for 0.33mm. Although it's often done by latex designers and firms, those patterns can NOT be used to cut a garment from 0.45mm. That's why if you order a particular garment in 0.45mm or 0.55mm, it ends up fitting too tight or being the "wrong size". Well, can't they just use a pattern the size up? My answer: absolutely fucking not. You're dealing with the luck of the draw here. Good thing many latex apparel consumers remain ignorant about these things. Ack! Think about it. Will a clothing company who specializes in, say, spandex body suits suddenly start making them in denim?

0.33mm The standard gauge used in latex apparel, especially women's wear. Think light to medium weight cottons, satins, and menswear fabrics. Great for hoods, catsuits, tops, dress, leggings or gaucho style pants (not very suitable for jeans style). This gauge is great for "pull on" stuff, i.e. garments without zips or any other closure. However, this does NOT stretch as much as a spandex knit fabric would. It needs more seams than 0.20mm to shape a garment correctly without that "flattening" effect.

0.45mm Another golden standard for latex gear. One of the most popular used thicknesses. A very noticeable heavier feel and a lot less stretch than 0.33mm, but still supple and stretchy. This is my favorite gauge. This gauge is awesome when you want a more structured look to your garments without going for the heavier stuff. Great for structured tops & dresses, trousers, light jackets.

0.55mm & 0.65mm If the entire garment is made from this, I find it causes chaffing and that sweat rash when worn longer than a few hours. That's just me. I apologize for not being as hard mutha fuckin' core as you. [I like layering a bunch medium weight stuff.] So which one to use? It all depends on what type of garment and how you want it to look. D.I.Y.ers should experiment (or send me money if they want the answer, like OMSB, 'cuz nothin' ain't free, dawg) and customers should consult with their latex designer of choice.

0.80mm This gauge is great for corsets, accessories, and once again, anything where you want a stiff heavy look & feel. Some designers will "sandwich" the corset boning between two pieces of sheeting to make the corset thicker.

0.92mm & 1.02mm The thickest fashion latex sheet available. Great for accessories, corsets, naughty bondage accoutrements, you get the picture.

Not every set of colors are available in every gauge. For more info on the colors manufactured by 4D read this previous post. Here's a comprehensive list of which gauges are available by color sets:

Supatex: 0.16mm, 0.20mm, 0.33mm, 0.45mm, 0.55mm, 0.65mm, 0.80mm, 0.92mm, 1.02mm

Only black, white, red, and natural is available in thicknesses of 0.92mm & 1.02mm.

Semi-Transparent: 0.20mm, 0.33mm

Vibrant: 0.16mm, 0.20mm, 0.33mm, 0.45mm

Pearlsheen: 0.33mm, 0.45mm

Tuesday, September 26, 2006

Stuff Every Latex Consumer Should Know About 4D Transparency Variations & Color Name Misnomers Vol. 2: Hot Pants, Hot Colors

This is a continuation of this post.

So I finally decided to post something edumacational. It's been well over a month or just about a month since. I welcome you to:

Stuff Every Latex Comsumer Should Know About 4D Transparency Variations & Color Name Misnomers Vol. 2: Hot Pants, Hot Colors


The latex sheeting dictators, 4D Rubber, have titled their super bright series of colors Vibrant. Yes, there are other colors besides black and red in latex fetish land! Latex clothing firms and DE's [design entrepenuers] may refer to this set of colors as Vibrant, Neon or Hot. They are very much brighter than the other 4D latex colors as a whole, except for turquoise. In my opinion, Vibrant Turquoise [similar to "smurf" blue or turquoise stones] while noticably brighter than the Supatex set, is still much darker than the rest of the Vibrants.

Colors

All of the Vibrant colors are: bright pink, magenta, green, lime green, turquoise, lemon yellow, yellow, orange, red. So what's the difference between lemon yellow and yellow? And how about lime green? They are pretty similiar, but they can be easily told apart. Unfortunately, I only have a small swatch of the lime green that's not big enough to be photographed properly. You're outta luck on that one, kids. When the time comes for me to buy rolls of those colors or if I can get my hands on some scraps from a fellow D.E., I'll photo them and post.

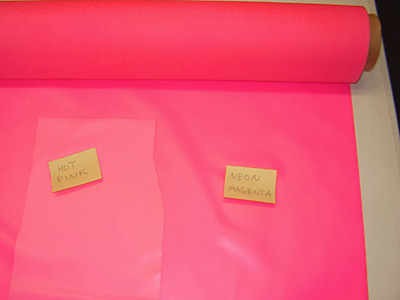
Bright Pink [aka "Hot Pink"] and Magenta are both very bright pinks, magenta cosiderably more so than bright pink. You can see the difference between them below:


This picture really doesn't capture the eye-blinding-acid pink qualities of Magenta as seen in person. I recently made a matching outfit in Magenta with Black trim. Now, if you've seen the Bright/Hot Pink in person, you full well know it's pretty damn bright. After working with Magenta, Hot Pink looked like a regular light pink in comparison!

Transparency Issues

Unlike the Supatex set which come in 9 gauges, the vibrants only come in three gauges [thicknesses]: .20mm, .33mm, and .45mm. The thicker the gauge, the less transparent the sheeting will be. The thinner the gauge, the less opaque. FYI: the most used gauge is .33mm followed by .45mm. I'll write a seperate post about thicknesses soon.

The Vibrant set of colors tend to run almost as, or just as transparent as the Semi-Transparent set. Talking 'bout .33mm here. .45mm is much more opaque. Magenta and Vibrant Red seem to be the most transparent out of the bunch. Just to confuse you more, I read in a forum somewhere [I don't remember where] someone refering to Magenta as "the Transparent Hot Pink". Be prepared to show some nipples and thong if you get an outfit in Vibrant Green, as well. Vibrant Turquoise is just as opaque as the regular colors.

Here's a crappy pic of the post-it note placed under the Magenta sheeting. If I knew how to focus a camera, you would be able to see the post-it note and the writing quite clearly.

Vibrant Red ahould also be renamed "Transparent". In this pic, a Vibrant Red w/ silver trim headband is placed over a black and white version. They are both placed on top of Magenta sheeting to show color contrast.

Sunday, August 27, 2006

Oh, Shiny...

It's best to lure the opponent in with some sort of shiny object.
--from a hilarious semi-famous anti-Spice Girl page.

[This post is NOT about lubing up the inside of your latex outfits to get into them. It's about shining the outside. Personally, I just use talc when needed. Go to the IAR forums for more info. If you don't already know, everything about everything latex/rubber/PVC/plastic is right there at your fingertips. It's free. However, if you find the site useful or have been a member for quite some time, please consider leaving a donation. Or one day it will not be there when you try to log on...]

Question: What should I use to make my latex shiny?

There are a few different ways to go about this, but before we go on, I'm afraid I'm going to have to upset you: You're never ever going to get your latex to stay perfectly, spotlessly, consistently shiny all the time. Pretty pictures are just that, pretty pictures. Shine is often sticky, moves around, rubs off on everything else. If you are a shine perfectionist, you have to keep doing touch-ups throughout the night. You shine my back, I shine your back, geddit?

I highly suggest not using products to condition/shine your beloved latex that are not manufactured and marketed towards our special purpose. Gee, you spent $400 on that catsuit, so you're gonna try to pinch a few pennies buy getting that Armor All crap? Whatever. Gonna drive your catsuit to work, too? Hmmm. That would be pretty awesome...

Before you begin to shine up your gear, make sure the outside is clear of all talc and dust. Clean surfaces are truely beautiful things. A quick once over with clean wet sponge does the trick. It's easier if you are already dressed and done with all the talc business.

There are several types of shine products on the market: aerosol spray, sex lube, "blue milk"/liquid, spray bottle (non-aerosol). They contain silicon or dimethicone (a type of silicon).

Aerosol Sprays:
Mainly used for photoshoots and the like. It really makes the latex look like polished glass. It's also very sticky and needs constant application. [Read: pain in the ass.] Clean up is more of a bitch, too. Some latex designers like Blackstyle and Demask have their own brand. (I spent $15 on the Blackstyle stuff. I also spent $20 in Customs fee, but that's another story.) Google "food grade silicon spray" and you can get the same crap for seven bucks, if not less. I only use this for photoshoots and fashion shows--basically scenarios where a fast and even application of extreme shininess is required. Do I have to remind you that aerosol sprays are a health and safety hazard? I didn't think so. Don't be a dumbass and store it next to that raging campfire.

Sex Lubes:
Lubrication such as Pjur Cult, Pjur Eros, ID Millenium are popular conditions (and dressing for *ahem* pleasure aids), Pjur Eros especially. The Pjur Cult has a, well, cult following and is supposedly hard to find in the US. I use the Eros stuff on occasion, but it's really really sticky and rubs off on EVERYTHING. Warning: this stuff is tres expensive! and very slippery! Be careful if you spill some on the floor or much busting of ass will occur.

"Blue Milk"/ Liquids:
The [in]famous blue milk. Guess what color it is? Yup. Demask calls it "Perv-o-shine" and Cocoon calls it Cocoon latex, PVC, and leather polish. I believe the manufacturer is Micro Chemical Products [sorry guys, no URL] from the UK. If it's your thing, you could probably buy tubs of the shit from them. The stuff smells really good, but you need quite a bit of coats to get a decent [read: totally bitchin' glassy] sheen. Warning: It may or may not yellow pearlsheen/metallic latex over extended use. I haven't done any long term official scientific tests with that or Armor All, but I really should...

Spray Bottle (pump, not aerosol):
Not an aerosol. It has the consistency of the "blue milk" stuff but usually white and often comes in a pump bottle. Demask's Rubber Rejuvenator, Deviant's Slick, and Black Beauty are just a few that come to mind. I never tried Black Beauty, so I have no kind of informed opinion on the matter. Personally, I use Rubber Rejuvenator and Deviant Slick the most. (I'm leaning towards the Deviant these days: you get twice as much as the R.R. for less than half the price. Plus, the feel is less "sticky" but just as shiny.) I'll spray it on the garment, then use a clean wet sponge for even application. For small items, I just spray it on the wet sponge instead and go. The Rubber Rejuvenator is especially great for old latex. It masks some light oxidization and gives an awesome shine. A little goes a long way with this stuff. Both brands last pretty fucking long compared to the other types of polishes. The night before a photoshoot or fashion show, I thoroughly powder the insides of the garments then use this type of shine to polish the outsides. It saves everyone a lot of time. For the inevitable "how'd those hand prints get on my ass?" touch-ups, I use the same stuff or the aerosol spray depending on time constraits.

303 Aerospace Protectant:
According to their website, 303 "is the most effective UV screening and anti-ozonant protection for latex rubber". I don't know if I would use it on an everyday basis but it works freekin' miracles on dying oxidizing latex. This place sells a 16 oz. spray bottle for $15. Make sure you read the MSDS [link is to an adobe acrobat file] before using it.

What to avoid like the plague:
Stuff with oils, baby oil, any type of petroleum products, petroleum jelly (brand name vaseline), fire, metals, sharp objects. Latex is "luxury item" expensive, so exercise care and common sense. Please.

Clean Up: The Aftermath
Please keep in mind that it's very difficult to completely remove the layer of shine with just one washing even with the recommended mild dish soap. As long as your gear is clean and well talced for storage, there shouldn't be a problem. If you just leave all that shine stuff on for a long time, there's a good chance the latex may horribly stick to itself. You may risk tearing it when the time comes to "unstick" it, especially if the items in question are rather old. Deviant claims its Slick product is safe for storage, but I dust the outside with talc anyway.

Happy Shining!

I am in no way affiliated with the companies, products, brand names, etc. listed herein. This blog post is, by no means the last word on latex conditioning. It's up to you to care for your own clothing. I am also not responsible if something goes horribly wrong.

Tuesday, August 01, 2006

Stuff Every Latex Comsumer Should Know About 4D Transparency Variations & Color Name Misnomers Vol. 1: The Introduction

Stuff Every Latex Consumer Should Know About 4D Transparency Variations & Color Name Misnomers Vol. 1: The Introduction

a.k.a. my blog titles now follow the rules of emo song titles

4D Rubber has the monopoly on latex sheeting for fashion apparel-- with only 43 colors. Boo! Hiss! Come on guys, start manufacturing some more colors. How about a regular cool grey to start? And a Pearlsheen dark navy blue? Did I mention they have a monopoly on natural rubber latex sheeting? Everyone uses it, from Joe Billy Boo making garments on the kitchen table as a hobby to Marquis to Vex to...Everyone else.

To start all of us off on the same page, the following's a rough description of the fashion sheeting lines they produce. If you already know this stuff, good for you. You get a cookie. Keep in mind other people (new or old to the joys of latex) might not.


Supatex: opaque "standard" colors such as white, red, black, purple, etc. Some companies may refer to it as Supatex or "standard" if at all. Official Supa-duper-tex colors include and are limited to: baby pink, black, dark brown, forest green, jade green, light blue, light brown, natural (same as semi-trans natural), olive [green], orange, pink, plum [red], purple, red, royal blue, scarlet [red], violet [purple], white, yellow.


Vibrant: bright, day glo, neon type colors. Some companies like me, Blackstyle, Marquis, etc. call them "neon" or "hot". Official club-kid colors include and are limited to: bright pink, green, lemon yellow, lime green, magenta, orange, red, turquoise, yellow.

Semi-Transparent: not completely transparent but still very revealing. Interestingly, the Semi-Trans colors are the same wholesale price as the standard Supatex set. Oops, did I just say that? Official nip-slip colors include and are limited to: blue, green, grey (there will be a whole entire seperate post devoted to this color), mauve, natural, pink, red, yellow.

Pearlsheen: has a shimery "pearlized" effect, similar to pearlized car paint or eyeshadow. Much more money wholesale than the Supatex, but worth every penny. Also known as "metallic". Official glittery goodness colors include and are limited to: blue, bronze, emerald green, gold, pewter, purple, red, silver.

F.Y.I.: 4D also manufactures dental dam. I could say something really witty and really dirty, but I'm not that smart. Honestly.

This is just an introduction to lay the foundation for future posts on transparancy issues...and blah, blah, blah. Yes, there will be a test. And yes, you should buy something from me.

Up next: hot pink vs magenta